
Utility Commands
This module contains generally useful, atomic commands that aren't otherwise categorized into a dedicated module.
These commands might be safe for use by anyone, or locked behind in-Discord permissions.
NSFW Images Detection Tools
As part of its moderation tooling, GiselleBot implements an (experimental) NSFW images detection system using TensorFlow.js as its base.
The detection system is based on Infinite Red's NSFW JS library and GantMan's Inception v3 Keras Model for NSFW detection to classify any image as a composition of 5 categories:
- Drawings: Safe for work drawings (including anime).
- Hentai: Hentai and pornographic drawings.
- Neutral: Safe for work neutral images.
- Porn: Pornographic images, sexual acts.
- Sexy: Sexually explicit images, not pornography.
The module was furtherly converted into a back-end module and customized with a caching system to enhance its performance.
See also
This interesting article by Infinite Red explains the reasons behind the creation of the original NSFW JS client-side module.
Warning
This module, by no means, is supposed to reliably recognize all NSFW images. Its main purpose is quickly classifying provided images and supporting humans in better moderating a server.
The module itself will not store or expose any sexually explicit images. The output will not contain a direct link to the original image, and a censored (low resolution, blurred) version of the image will be locally cached and used to refer to the original image.
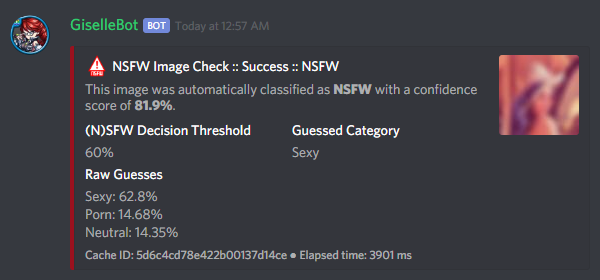
Here's an example of an output of this command, and the corresponding censored image:

See also
For those of you with a background in image processing - yes, Lenna is actually flagged as NSFW with a confidence score of 81.9%!
If you don't know what I'm talking about, refer to this Wikipedia page.
Note
The NSFW threshold is configured from your server's AutoModerator page on the dashboard.
Server-related Tools
/serverinfo
Command Syntax
/serverinfo
Command Description
Prints a bunch of info about the current server.
Permissions Needed
- User: None.
Examples
/serverinfo
Note
The expires_after option below takes the standard time code (e.g. 1d3h2m) - or a Discord timestamp mention referring to a future time - described in Time Format Code.
/invites create
Command Syntax
/invites create [channel:{channel}] [expires_after:{time code}] [max_uses:{number}] [temporary:{true/false}] [unique:{true/false}] [alias:{text}] Command Description
Creates an instant invite to the current server. All parameters are optional, here are the meanings of each parameter and the default values:
channelselects a target channel for the invite. The user running the command must have "Manage Server" and "Create Instant Invite" permissions in the target channel. Default: the current channel.expires_aftersets how long the invite should last (use the time code syntax, e.g.1h). Default: no expiration.max_usessets the maximum number of uses for the invite. Default: unlimited uses.uniquecreates a unique invite iftrue, or uses an existing one with similar settings otherwise. Timed invites are always unique by default. Default:false(use an existing if available).temporarysets whether members that joined via the invite should be automatically kicked after 24 hours if they have not yet received a role. Default:false.aliasadds an optional label (maximum 32 characters long) to the invite. If the Members logger with invites tracking is active (refer to the Logger section in the Administration module documentation) the alias will be shown in/invites usage. Default: no alias.
Permissions Needed
- User: Manage Server, Create Instant Invite. Discord's command-permissions picker only gates on Manage Server; Create Instant Invite is a separate in-code check (see Layer 3).
- Bot: Create Instant Invite
Examples
/invites create
/invites create channel:#welcome expires_after:1h max_uses:10 alias:launch-event
/invites prune
Command Syntax
/invites prune [max_uses:{# of uses (inclusive) to consider invites "unused"}] [user:{user}] [channel:{channel}] Command Description
Deletes unused invites (invites with 0 uses), or invites under a certain number of uses (inclusive). You can specify the number of uses to consider an invite as "unused" with max_uses (default: 0).
You can filter by invite creator through the user option, or by invite target channel through the channel option.
Up to 100 invites will be pruned for each command use. If you need to prune more than that, use the command multiple times. This command might be slow and seem temporarily unresponsive for high amount of invites being pruned.
Permissions Needed
- User: Manage Server. Also re-checked in-code, not just gated by Discord's command-permissions picker (see Layer 3).
- Bot: Manage Server
Examples
/invites prune user:@cycloptux
/invites prune channel:#greeter max_uses:5
/invites usage
Command Syntax
/invites usage [user:{user}] [channel:{channel}] Command Description
Shows usage stats about active invites in the current server.
You can filter by invite creator through the user option, or by invite target channel through the channel option.
Permissions Needed
- User: Manage Server. Also re-checked in-code, not just gated by Discord's command-permissions picker (see Layer 3).
- Bot: Manage Server
Examples
/invites usage
/invites usage channel:#welcome
Message-related Tools
Note
Auto-publish setup and auto-react setup are configured from your server's Settings page on the dashboard.
/rawmessage
Command Syntax
/rawmessage message:{message id or link} [channel:{channel}] Command Description
Shows a specific message content in its "raw" version, making markdown-formatted messages or embeds easy to copy and paste.
Embeds can be re-sent through GiselleBot using /send embed. This might not work 100% of the times for complex embeds.
Note
You can also right-click (or long-press) a message and choose Apps -> Raw message to run this against that message directly, without typing a message ID or channel.
Note
If channel targets a channel other than the one you ran the command in, the reply is always
ephemeral (visible only to you), so the raw content isn't posted publicly into a channel that
may not have access to the target channel.
Permissions Needed
- User: None.
Examples
/rawmessage message:123456789098765432
/rawmessage message:123456789098765432 channel:#rules
/rawmessage message:https://discord.com/channels/533372744130363392/534171951732752394/534751296847216642
/savechat
Command Syntax
/savechat [count:{# of messages}] [channel:{channel}] Command Description
Dumps a certain number of messages from the given channel (defaults to the current channel) into a .csv file.
The file will be sent to the author of the command via Direct Message. Instead of receiving the actual file as Discord attachment, the author will receive:
- An URL to an encrypted
.zipfile containing the actual.csv. - The password to decrypt the archive.
Note
The archive password is unknown to anyone but the author of the command, not even the bot developer! The archive will only be available for 30 days, after which it will be deleted.
If count isn't specified, the default value of 150 messages will be used. The maximum number of messages you can save is 2000.
Warning
This command might be very slow, or even fail, if you are trying to dump a high amount of messages. Please be patient.
Permissions Needed
- User: Manage Messages. Also re-checked in-code, not just gated by Discord's command-permissions picker (see Layer 3).
Examples
/savechat count:500
Note
Use Discord's native pin button (right-click a message -> Pin Message) to pin or unpin messages.
/emojify
Command Syntax
/emojify text:{word(s) to convert, or one emoji name} [verbose:{true/false}] Command Description
Converts a sequence of words into a sequence of emojis, provided the bot has access to the emojis.
Emoji names are case-sensitive.
By default, this command only tries to fetch emojis from the current server, effectively limiting its usefulness.
By setting one, or more, server(s) as emojify source servers (see below), GiselleBot will look for emojis in those servers as well as the current server when /emojify is used.
Setting verbose to true looks up that one emoji name instead of converting text, and shows which server it was fetched from.
Permissions Needed
- User: None.
Examples
/emojify text:BlobOwO BlobPats
/emojify text:BlobOwO verbose:true
Note
Setting one or more servers as emojify source servers, and excluding the current server's own emojis from being used elsewhere, are configured from your server's Settings page on the dashboard.
Note
Building an embed with JSON is done with /send embed, documented under the Send module - only JSON is accepted, there's no tag-based shorthand.
Delete DM Message (context menu)
How to use it
Right-click one of the bot's messages in your DM with it -> Apps -> Delete DM Message.
Description
Note
This only works on messages the bot itself sent you, in your DM with it. It's not subject to any permissions.
Deletes that direct message. This can be particularly useful as a privacy/security feature to delete previously sent passwords to encrypted archives, in order to make them completely unrecoverable.
Note
Non-sensitive direct messages (e.g. moderation actions) might still be logged into the owner-restricted bot console.
Role-related Tools
Note
/role get and /role drop (the other two /role subcommands) are documented under Self-Assignable Roles instead, alongside the rest of that sub-module.
/role members
Command Syntax
/role members role:{role} [format:{mention/id}] Command Description
Prints the list of users that currently have the specified role. Users will be printed using their username (default behavior), but you can use the format option to specify whether you want the list to be printed using the user IDs or mentions.
The list will always be sorted in alphabetical order based on the users' usernames.
Permissions Needed
- User: None.
Examples
/role members role:@Discord Moderator
/role members role:@Verified format:id
/role add
Command Syntax
/role add role:{role} [user1:{user}] [user2:{user}] [user3:{user}] [user4:{user}] [user5:{user}] [users:{user ids}] [everyone:{true/false}] Command Description
Adds a role to up to 5 individual users, any number of users via the users option, or to everyone in the server (set everyone:true instead of picking users - this asks for confirmation before running, since it affects the whole server).
Note
user1-user5 pick up to 5 users individually. For more than 5, use users instead: a space-separated list of user IDs or @mentions (any number, e.g. users:123456789012345678 987654321098765432). Both can be combined in the same run - overlapping users are only affected once. Use everyone:true for the whole server.
Permissions Needed
- User: Manage Roles. Discord's command-permissions picker for
/roleitself is open to everyone; Manage Roles is enforced in-code for this subcommand (see Layer 3). - Bot: Manage Roles
Examples
/role add role:@Discord Moderator user1:@cycloptux user2:@NaviKing
/role add role:@Verified users:123456789012345678 987654321098765432 111111111111111111
/role add role:@Verified everyone:true
/role remove
Command Syntax
/role remove role:{role} [user1:{user}] [user2:{user}] [user3:{user}] [user4:{user}] [user5:{user}] [users:{user ids}] [everyone:{true/false}] Command Description
Removes a role from up to 5 individual users, any number of users via the users option, or from everyone in the server (set everyone:true instead of picking users - this asks for confirmation before running, since it affects the whole server).
Note
user1-user5 pick up to 5 users individually. For more than 5, use users instead: a space-separated list of user IDs or @mentions (any number, e.g. users:123456789012345678 987654321098765432). Both can be combined in the same run - overlapping users are only affected once. Use everyone:true for the whole server.
Permissions Needed
- User: Manage Roles. Discord's command-permissions picker for
/roleitself is open to everyone; Manage Roles is enforced in-code for this subcommand (see Layer 3). - Bot: Manage Roles
Examples
/role remove role:@Discord Moderator user1:@cycloptux user2:@NaviKing
/role remove role:@Verified users:123456789012345678 987654321098765432 111111111111111111
/role remove role:@Verified everyone:true
Role Menus
/rolemenu posts a set of buttons in a channel that let members assign or remove one of your server's self-assignable roles by clicking.
Note
Role menus are buttons, not reactions - members click a button instead of adding a reaction emoji to pick a role. The role group data itself (which roles belong to a menu) lives on your server's Self-Assignable Roles page on the dashboard; see the Self-Assignable Roles guide for how to set up a role group before posting a menu for it.
/rolemenu create
Command Syntax
/rolemenu create group:{role group} [channel:{channel}] Command Description
Posts a new self-assignable role menu for the given role group. Defaults to the current channel if channel is omitted.
Permissions Needed
- User: Manage Roles
Examples
/rolemenu create group:Colors
/rolemenu create group:Colors channel:#roles
/rolemenu remove
Command Syntax
/rolemenu remove [message_id:{message id}] [channel:{channel}] Command Description
Deactivates a role menu - its buttons stop working, but the message itself is not deleted. Defaults to the most recent role menu message in the given channel (or the current channel) if message_id is omitted.
Permissions Needed
- User: Manage Roles
Examples
/rolemenu remove
/rolemenu remove message_id:123456789098765432
/rolemenu update
Command Syntax
/rolemenu update [message_id:{message id}] [channel:{channel}] Command Description
Refreshes a role menu's buttons to match its role group's current roles (useful after adding/removing roles from the group). Defaults to the most recent role menu message in the given channel (or the current channel) if message_id is omitted.
Permissions Needed
- User: Manage Roles
Examples
/rolemenu update
/rolemenu update message_id:123456789098765432
Other Tools
URL Shortener (dashboard)
Note
Shortening a URL is done from your server's Tools page on the dashboard, not a Discord command - see Clock & Member Count Channels for the full details.
/snowflake
Command Syntax
/snowflake id:{Discord snowflake} Command Description
Extracts the time from a valid Discord snowflake, showing it in multiple relative and absolute formats.
Permissions Needed
- User: None.
Examples
/snowflake id:123456789098765432
Note
Clock and member-count channels are created, edited, and deleted entirely from the dashboard. See Clock & Member Count Channels.
See also
Full migration mapping for these commands: Migration Guide.